


Keep it safe…
Ensure that students have plenty of space around themselves when they are working with wire and that they are aware of the dangers of sharp ends near eyes – both their own and their neighbours’. you might wish to encourage the wearing of safety goggles.
Working with wire is a very accessible and immediate way of introducing notions such as ‘drawing in space’ and volume, and can be used as an exercise across all subject matters and integrated into topics and projects across all key stages. It requires limited resources and simple tools, and as an activity, aids the development of 3D skills, like dexterity and the manipulation of materials, as well as thinking through and solving spatial problems aesthetically.
Often, storage is an issue for teachers – so a 3D project spanning several weeks can be problematic. Working with wire, on the other hand, can be done in one or two double lessons with very satisfying and often outstanding results. It’s suitable for all levels of ability and can be extended to introduce more materials and processes such as binding and attaching elements in different materials together.
It’s often the ‘unlikely’ child who succeeds in a 3D task, so this is the opportunity for visual/spatial thinkers to come out and shine! Ironically these learners often find drawing difficult, as it requires similar parts of brain activity as writing and reading and not ‘making’ and ‘doing’, so given the opportunity to draw three dimensionally, visual/spatial children can ‘articulate’ in a more immediate and natural language.
As a teacher, you may find talent where you had least expected it! Like all exercises, drawing and making with wire requires time, space and practise. What’s most important is that students enjoy the sense of play and enquiry and don’t worry about changing their sculptures/ drawings as they go.
Materials
There are many different types of wire on the market and they all have different properties. In our experience ‘modelling’ wire is the best for holding its shape while being manipulated. It is easy to create volume with it and as it has a natural rigidity to it, is easy to make forms stand. This often comes in meter rods, so is ideal for making large sculptures as well as small. It tends to come in a dull, iron rich colour and will rust if left outside.
Normal flex-wire does not have the same structural properties as modelling wire, so though still good for ‘drawing in space’ and suspended sculptures, it does not have the rigidity to create standing forms. It is a brilliant material for binding and we’ve used it a lot when working with withies and sticks to join elements together. You can also get coloured wire and copper wire, often very fine, with little or no structure, but wonderful for fine, rhythmic, decorative elements of a sculpture. Scrap stores can be a brilliant source for old electric wire, which can be stripped down to find fine strands of colourful, decorative wire.
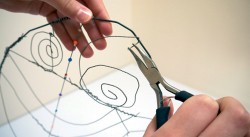
You’ll need to provide pliers – we always introduce a session with a basic A to Z of how to use them and their basic anatomy. It can also be handy, although not essential, to have jewellery making tools to hand. Flat nose pliers and long nosed pliers are useful to manipulate wire and to make strong ties.
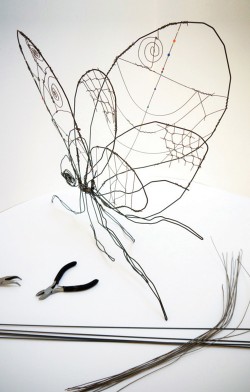
1. Making insects with wire (KS3)
This lesson helps students start tuning in to working three dimensionally and making sculptural representations by analysing the real world around them – they begin by drawing in space with wire, on a 2D plane, and then extend the wire drawing into a sculpture. The subject of insects is particularly good as most learners can relate to the look and feel of them and think about how that may be interpreted into form and shape. It’s a very good idea to have images of insects around and even better to have real specimens; art meets biology! Start by making a simple linear shape using the wire modelling rods – perhaps two wings, or any point of entry that comes intuitively. Use Flexi-wire (piscesart.co.uk) to fasten the larger shapes together, using pliers to help you make neat, strong ties.
Build more linear shapes in the modelling wire, always referring back to the initial stimuli of the insect. Encourage students to analyse what they are looking at and what they are making and how they interpret shapes from real life to those they make. Encourage students to ‘enjoy’ shapes; get them to look at the head, abdomen, thorax, antennae – look at the rhythms and shapes and use the wire to make equivalents. Tie elements together with Flexi-wire. As their construction grows, make students aware how they have evolved from a 2D line drawing to a 3D sculpture. Ensure they keep looking at their creations from all angles. When they change one side, they need to check the other. Keep changing and keep looking.
Use more Flexi-wire to start to infill the larger shapes with pattern. Just like how in a drawing the different pencil marks help build rhythm, the different wires help build form. Add beads for fun!
Summary
Be prepared to be staggered by how articulate the outcomes are and allow the students time and space to talk about their creations and see them in a clear space.
2. Working with wire and making how it feels to be you (KS4)
In this lesson, students will ‘draw with wire’ to make a model of themselves inspired by how their bodies ‘feel’, not ‘look’. This activity is about getting students really to think about the weight and feeling of drawing with wire, and we would consider it to be an extension activity, as it requires advanced visualisation and perception. It’s a good idea when introducing the task to leave it loose as to whether it’s a drawing or sculptural exercise – the aim is to get the teenagers to really explore the wire and its potential for experimenting and ‘drawing’ in 3D.
It should be left open as to whether final pieces should stand, hang or just be flat on the floor or leaned up against the wall. Ask students to imagine not knowing their own bodies by sight but to close their eyes and, from within, to explore the sensations of weight, strength, centre of gravity, movement and posture.
Ask them to visualise the ‘feeling’ of the weight of their hands – all the tingling of the nerve endings, the pulse of the blood and energy flowing to the tips of their fingers, the weight of the thumb making their hands feel weighty in comparison with the rest of their bodies: ‘With all this focus on your hands, don’t they feel much bigger than they look’?
Ask them to ‘feel’ how they are standing or sitting, where their centre of gravity is, which way they have a tendency to lean. Do they feel the ball of their foot, the tilt of their hip, the twist of their knee? Can they elongate their body, collapse their spine? Some students quickly realise the challenges of working in 3D and the potential for frustration if their models do not stand up or the struggle with trying to find an aesthetic in a new art form.
Suggest working on building a good base, large enough to support the weight of the body and make sure that feet and legs aren’t ‘hinged’ onto the base with bits of wire, but that single lengths of wire travel up from the base, through the whole body, to add strength and support to the structure. Modelling wire is an excellent medium for this, as it is totally malleable whilst also being very strong.
Summary
You’ll find that the students approach the subject matter from many different angles. Some will be very literal in the interpretation and others able to add more lyrical elements. Even the most literal interpretations can have visually strong outcomes, like one student of mine who made a hand out of modelling wire, with articulate structure and copper wire detailing, creating refined beauty.
Another pupil described the feeling of vertigo through her work and described the tension in her back with spirals of wire. Other students may be inclined to make whole ‘life’ like models, but all will have the chance to really explore wire and express both emotional and physical reality through making.
Info bar
Additional resources
• Accessart is a UK registered charity aiming to ‘further the advancement of education in the visual arts’, established by Paula Briggs and Sheila Ceccarelli, graduates of the Royal College of Art Sculpture School. For more inspirational teaching and learning and to share your practice, got to accessart.org.uk
About the expert
Sheila Ceccarelli is the co founder of AccessArt with Paula Briggs. She is a graduate of Norwich School of Art and has an M.A. from RCA sculpture school, and is passionate about sharing her enthusiasm for making and facilitating the creative process in others.