


At a time when the emphasis on more traditional academic achievement is increasing, why should secondary schools consider making improvements to their grounds rather than investing in the latest technology or academic intervention?
Part of the answer is to do with how we plan to accommodate rising school populations. Pupil numbers (aged 15 and under) are going up, leading the DfE to release significant funds to enable local authorities to respond to the pressure on Basic Need requirements for primary schools.
In some establishments the money is being spent on putting additional classroom buildings into the school grounds – adding a form of entry, but reducing the amount of outdoor space available at a time when numbers of children using that space is increasing. From 2016 this will impact secondary schools and many will also need an additional form of entry at year 7 and subsequently up through the school.
Swallowing up outside space with new classrooms may seem inevitable, given the figures. However, by enhancing the way the outdoors is used to deliver teaching and learning, and by building this into timetabling, it is in fact possible to reduce the need for additional buildings and increase the flexibility and creativity of the curriculum at the same time.
Children are accessing the outdoors less than ever before and suffering from a well-documented range of health and wellbeing issues as a result. If just one fifth of your school is learning in the richness of your school grounds at any one time, in spaces designed to educate, shelter and inspire, then you will save money on expensive new buildings and associated on-costs, reduce the amount of maintenance needed and give your students and teachers a depth and breadth of learning experience that cannot be replicated in a classroom. So… how can you make it happen?
Where to start
Be realistic – if time and money are short then you need to be mindful of that in your planning. You don’t want a well-intentioned but half-finished project.
Look at your space. Consider how you can use existing building edges, landscaping and naturally shaded areas to define your learning areas.
Observe which spaces the pupils currently use and how they use them – what are they sitting on? Where do they congregate naturally? Where do they seek shade? Where are the social spaces and which spaces are too dark or cold for them to use?

Consultation
Consult with the facilities management team about how much time they have to spend on maintaining any proposed developments.
Are teachers looking for space that:
• brings the natural sciences to life (space for experiments, wildlife areas, growing spaces)? • provides opportunities for real-life and large scale maths and technology experiences (large spaces for applying calculations such as areas and perimeters on a giant scale)? • inspires creativity (amphitheatre, large scale art space, sensory space)? • creates social and discussion spaces (seating areas, small clearings, shade)?
It is essential to ask questions that bring out what people want to achieve in the outdoor space – not just what they want to have there.
Leadership staff need to be involved to ensure that the outdoor space contributes to the school’s development plan and outdoor learning is embedded into the curriculum through recruitment, line management and appraisal structures.
Pupils can get involved by:
• undertaking surveys within the grounds (ecological surveys, use surveys, mapping) • conducting research (questionnaires, analysing the information gathered, researching the local and natural history of the site) • creating design solutions (working on seating or shelter) • practical implementation (creating a range of wildlife habitats, developing signage) • management and maintenance of the site (clearing out the pond, pruning fruit trees)
Planning
If you have little funding then you will need to make plans that allow for incremental progress. Group your consultation results into quick wins and longer-term projects. Don’t start anything that you cannot finish.
• Departments need easy access to the areas they may use, for example a fire pit may work well near to the food technology block. • You should also take into account where classrooms overlook areas, and whether activities taking place outside could distract the learning inside. • Consider storage implications. Pond dipping equipment is more likely to be used if it is stored in a shed next to the pond than if it has to be found inside the school. Effective outdoor storage also avoids cleaning issues being exacerbated by traipsing quantities of wet or dirty equipment through the school.
Resources
Think about what you can achieve by moving around what you already have or by bringing things on site that can be sourced for free.
Moving around could include:
• digging a hole for a pond and using the resultant topsoil for a planting area or a raised turf seating area • making a pizza oven out of a pile of disused bricks • breaking up concreted areas to create rockeries and fire pits and to increase the diversity of surfaces • opening out woodland by cutting down unsafe trees and using the tree trunks to make seating for outdoor classroom areas • making changes to the mowing cycle to allow naturally seeded wildflower meadows to emerge.
Free items could include:
• Compostable materials from the school kitchen (and from pupils’ homes) to create compost piles and wormeries • Cuttings from gardens to start planted areas • Resources from your local DIY store, many of whom are happy to form relationships with individual schools and pass on spare wood, seeds store damaged tools etc • Old tyres from car scrap yards, which can be used for seating, planting and bug hotels • Local tree surgeons may have access to sources of wood for fuel, building, carpentry and even log cabin building • Left over materials from a nearby building site can be useful, for example:
a. breeze blocks (to form the base for sheltered structures) b. scaffolding planks (to make raised beds) c. top soil (to fill the raised beds) d. tubing and tarpaulin (to create water experiments, features, courses and irrigation systems) e. various loose but manageable parts in wood, brick or metal for construction and creation f. old skips, tonne bags and rubble bags can make excellent planters g. builders may also be happy to lend you the use of a digger and operative for an hour to dig that extra large hole or create your basic landscape.
It is important to ensure that any materials that you bring onto the school site have been checked for contaminants such as wood treatments or soil contaminants – advice is available from a range of sources including the Soil Association and Learning through Landscapes.
Volunteers
A volunteer day at the school could involve folk from local businesses, churches, community groups, parents/carers and family members of pupils, PTA members etc. (be mindful of safeguarding issues if you choose to mix pupil volunteers with adult helpers). Before bringing volunteers on site you must be absolutely clear about what you want to achieve and you must have a clear plan as to how you will achieve it alongside a risk assessment for those taking part.
Organisations such as the Conservation Volunteers (tcv.org.uk) can sometimes be approached to provide support with developments that involve nature conservation work (such as opening up woodland spaces, clearing ponds, coppicing, bridge-building etc.)
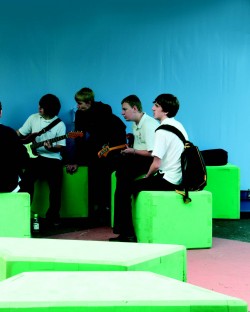
Seating and meeting spaces
The most important elements you are likely to add to any school grounds are seating and meeting spaces. When planning seating for indoor classrooms designers and teachers think about how they would like to group a class for different teaching approaches; the same discussions should take place when planning seating outside.
Think about:
• space for different sizes of group • spaces that allow social interaction • spaces that create atmosphere • space for demonstration, presentation and instruction • space to take performances outside • spaces with shade and shelter to allow year-round use
Space explorers
Hampshire County Council’s Landscape Strategy and Design team has been working with Quilley School of Engineering and artists Snug and Outdoor to come up with a tool to enable secondary school pupils to explore the design of their own outdoor spaces. As part of broader, whole site planning approach The Big Landscape Experiment (BleX) enables pupils to try out different defined spaces, seating solutions, shade options and layouts in their own school site. (such as opening up woodland spaces, clearing ponds, coppicing, bridge-building etc.) Seating and meeting spaces
The most important elements you are likely to add to any school grounds are seating and meeting spaces. When planning seating for indoor classrooms designers and teachers think about how they would like to group a class for different teaching approaches; the same discussions should take place when planning seating outside.
Some tips:
• Try to include a diversity of space, for example natural green areas to create a cooler, more restful environment that will attract wildlife • Decorative shrubbery such as topiary can beautiful but needs constant maintenance • Decking surfaces need to be treated with a non-slip coating as left untreated they can become slippery in the wet • Create spaces that allow for multiple usage – consider how the curriculum might change in the future • Use sustainable or recycled materials wherever possible • If you have very limited outdoor space then think of solutions that involve height such as vertical growing systems or utilising roof-top spaces • An external source of water is a must, ideally both a fresh water tap and a rainwater collection point are good to have in your grounds and need not be expensive
Ultimately, making the most of your outside spaces needn’t be either daunting, or prohibitively expensive (especially if you lose the need for an extra indoor teaching space through doing so). Take a ‘learning walk’ around the outside of your buildings, and note down what you see, as the first steps towards ensuring that everywhere inside your school gates offers opportunities for young people to engage, explore, develop, and learn.
Top tip: Raised planting areas are relatively easy to construct and maintain – you can also make effective use of recycled materials. For the best results locate your planting area near to the food technology or science blocks and ensure there is a source of both fresh and rainwater nearby. Ideally you will be able to store garden tools in a simple outdoor shed.
Info Bar
The vision of learning through landscapes is that every child benefits from stimulating outdoor learning and play in their education. The organisation aims to enable children to connect with nature, be more active, be more engaged with their learning, develop their social skills and have fun. Where possible young people should be encouraged to have a say in the way their grounds are used and improved. As a result they learn to create and look after something valuable; their self-esteem grows and their behaviour improves, along with their potential to learn and achieve. Find out more at ltl.org.uk
About the Author
Juno Hollyhock has been executive director at learning through landscapes since 2012, having previously worked as national communications manager at oasis. She has a broad range of experience in the field of outdoor learning and children’s play and brings some practical hands-on knowledge to the role as she is a keen vegetable gardener and keeps chickens and pigs for eggs and meat!
BRMB Social research report commissioned by DCSF on parental involvement in children’s education (England only), May 2008


“Two thirds of parents would like to get more involved in their child’s school life”