


Introduce learners to the fascinating history and future potential of wireless communications technology, with David Taylor’s adaptable classroom suggestions…
TODAY YOU WILL…
- DISCOVER THAT A HUGE NUMBER AND RANGE OF ELECTRONIC PRODUCTS MAKE USE OF WIRELESS COMMUNICATIONS TECHNOLOGY
- DISCUSS THE IMPACT THAT COMMUNICATIONS TECHNOLOGIES HAVE ON THE LIVES OF PEOPLE – POSITIVE AND NEGATIVE >DISCUSS HOW COMMUNICATIONS TECHNOLOGY HAS CHANGED AND IMPROVED OVER TIME
- ANALYSE EXISTING PRODUCTS
- USE CHOOSER CHARTS TO GENERATE A NUMBER OF DESIGN IDEAS.
Communications technology is a huge industry worldwide and a vast range of electronic products have now been developed offering better, faster and wider communications between people across the world. The prevalence of mobile phones is a good example of this, as well as the emergence of wireless networks, 3G etc. in enabling people and devices to communicate with each other without cables and wiring. This lesson offers a basic introduction to wireless communications technology, using infra-red as a starting point. Infra-red is relatively simple, components are cheap and it enables students to understand some of the basic principles of how wireless control works. It focuses on the electronic design and programming elements of this type of project. You may want to build in other elements of product design such as casing design, CAD/CAM, modelling etc as appropriate. The plan can be adapted to the needs of your school, students’ abilities and the skills and knowledge you wish to impart. It could be as part of a full design and make project, adapted for use as a series of focused practical tasks or as standalone activities to introduce concepts, ideas and knowledge. The full resource, available to members of the D&T Association, includes taking the designs to manufacture and full explanations of PIC controllers, and how these work with infra-red control. The project was developed for Years 7 or 8, but some elements may be suitable for Year 9s or even as a basic introduction to remote control at Key Stage 4.
STARTER ACTIVITY
Remind students that a huge number of electronic products are designed to allow people to communicate wirelessly.
Ask them to:
- Make a list of as many different devices they can think of that make use of wireless communications technology
- Present their findings in a spider chart
- List the advantages and disadvantages they think these devices have had to the lives of the people who use them.
With the Café Que questions in mind (and perhaps displayed on the whiteboard or a flipchart), start the session with a discussion of changes in communications technology, using the mobile phone as an example. It can be done in small groups or individually, and you will need to print out mobile phone pictures for students to order in a timeline. It’s also good practice to allow students to handle physical products wherever possible, so if you have access to old phones they could be given out for them to investigate, too. >>
MAIN ACTIVITIES
HISTORY OF COMMUNICATIONS TECHNOLOGY
CAFÉ QUE
This is a useful tool to consider a range of design issues. Discuss the significance of these points with the class before they undertake the following activity:
Cost – How much does the product cost? Is this a fair price?
Aesthetics – What does it look like? What makes it appealing/ unappealing? FFunction – How does the product work? What does it do? What electronics are used?
Ergonomics – How does the product handle? Is it nice to feel/touch? QQuality – Is it well made? Does it look a good quality product?
User – Who is the intended user of the product? What age range is the product aimed at?
Environment – Does it have any positive or negative effects on the environment? Is it designed with sustainability in mind?
With the Café Que questions in mind (and perhaps displayed on the whiteboard or a flipchart), start the session with a discussion of changes in communications technology, using the mobile phone as an example. It can be done in small groups or individually, and you will need to print out mobile phone pictures for students to order in a timeline. It’s also good practice to allow students to handle physical products wherever possible, so if you have access to old phones they could be given out for them to investigate, too. >>
LESSON PLAN
Ask students to:
- Put the phones in the order they think they were invented. + Identify changes and improvements that were made from each phone to the next? + Complete a product analysis of one phone. Repeat for a communications product of their own.
USING IR CONTROL
This activity engages students in research into how infra-red control works and its advantages and disadvantages. In small groups they should research infra-red technology, presenting their findings to the class. If internet access is not possible in school this could make an ideal homework activity. Presentations should be short (three to five minutes) – encourage learners to be concise and ensure that the information they are presenting is relevant. This is an excellent opportunity to link with ICT subject content in terms of developing and delivering presentations. Some students may create a short movie where equipment is available.
SYSTEM INPUTS AND OUTPUTS
Inputs turn a real world signal into an electronic signal. These are usually switches and/or sensors (in this case an IR receiver). Outputs turn an electronic signal back into a real world signal, such as light, sound etc. In a block diagram in electronic system design the arrows represent the signals, whereas the blocks represent the sub-systems.
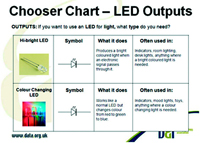
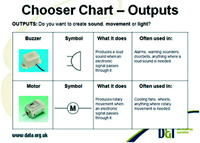
Chooser charts
Chooser charts will help your students decide which outputs would be the most appropriate for their product idea. This replicates the types of choices engineers would have to make in industry given the available technology.
FORMULATING DESIGNS
When the remote control is pressed an infra-red signal will be sent to the IR receiver which will detect this. A PNP transistor is used to turn this into a signal that turns on the output when the remote is pressed.
A PNP transistor should be used as this inverts the output signal. The signal from the IR receiver is output low when a signal from the remote control is detected. This needs to be changed to an output high so the output device turns on when a button on the remote is pressed.
Let the students decide which output to use for their system. This is also a good opportunity to explain how this particular system works. Get them to list three remote controlled products that they could design and make that use each of a buzzer, a motor, LEDs and colour changing LEDs. From this they should settle on a single design, including consideration of user and purpose. These can perhaps be made in subsequent lessons.
KEY RESOURCE
ONE-STOP SHOP
Technology Supplies can supply you with all of your classroom resources, from electronic component parts, control technology, machine tools and sewing machines, through to CNC routers, 3D printers and laser cutters; in other words, the company has everything you need to teach D&T. Being at the forefront of innovation, Technology Supplies boasts the largest range of 3D printing equipment in the UK, with 3D printers from only £999, and the widest range of acrylic available within the education sector. With 26 years’ experience, Technology Supplies has built an outstanding reputation for supplying quality and affordable D&T products.
To request a copy of the latest catalogue, visit technologysupplies.co.uk or call 0845 567 0000
SUMMARY
Whether you chose to have your students move on to make their own designs or not, their work should be evaluated at each stage of the process. Self or peer evaluation should invite them to consider:
- the steps they took in designing and making
- the materials used
- how the design changed and differed from the original concept
- whether it met the needs of the user or company commissioning it
- problems that arose and how these were overcome
- what they might do to improve the final design.


Introduce learners to the fascinating history and future potential of wireless communications technology, with David Taylor’s adaptable classroom suggestions…